
WAD Editor Torture Test
Draft version 0.9 - December 95
Introduction
I began writing this document when I was thinking about how DEU 6.0 could be both powerful and user-friendly. I tought about what WAD authors would like to be able to do, instead of taking the programmer's point of view. I received many suggestions from DEU users and I also used my own experience as a WAD author. Several people suggested that I take a look at other programs and see what is easier or more difficult to do with them. So I tested DETH, DCK, WadAuthor and others, and I saw how a level builder would work with these editors and how easy it was to do such and such task. Finally, I put my ideas together and wrote this little scenario which shows how a WAD file could be created.
Each step in this scenario results in a well-formed WAD file, without any special effects. Any WAD editor should be able to create all intermediate WAD files up to the final one, whether it is sector-oriented or linedef-oriented. What will make the difference is the ease of use: several of these steps will be very difficult to perform with some editors, often requiring you to delete some parts of the level and re-create them somewhere else. Think about what this would mean for a real level with hundreds of sectors.
The following scenario is not unrealistic: it shows how someone (novice or experienced) could build a level, changing one's mind from time to time. Of course, there are many other important features which are not illustrated directly by this scenario, such as multi-level UNDO, the ability to see all the properties of an object by simply moving the pointer over it, how easy it is to navigate through the menus and dialog boxes of the program, etc. But if you try to follow this scenario and build the level, you will probably use these features anyway.
Step 1
 |
Create a rectangular room with a player 1 starting point in the SouthEast corner. The room is 256 units long in the North-South direction and 320 units long in the East-West direction. Properties for the first room: |
Note: wait until the next step before saving your level because most BSP builders will fail if a level contains only one convex sector.
WETT Scores: (this is only an example - real values will be added later) DEU 5.21: 10, DETH 3.6: 10, DCK 2.2: 10.
Step 2
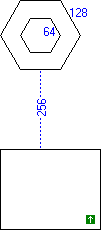 |
Create a second room to the North of the first one. This room is shaped like an hexagon and its sides are exactly 128 units long in order to be able to align the textures correctly. In the middle of the room, there is an hexagon-shaped obstacle (void space). Its sides are exactly 64 units long. The floor of this room is at 128 and the ceiling is at 192. The two rooms are 256 units apart from each other. Properties for the second room: |
WETT Scores: (example) DEU 5.21: 9.
Step 3
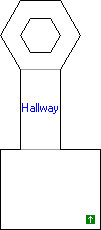 |
Connect the two rooms with a hallway. Properties for the hallway: |
WETT Scores: missing...
Step 4
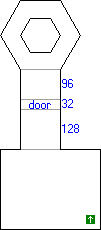 |
Create a door in the middle of the hallway. The door is 32 units thick and its southern side is exactly halfway between the two rooms. This is a normal door which opens when the player pushes it. It starts closed: the ceiling is at the same altitude as the floor. Properties for the door: |
Step 5
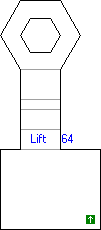 |
Add a lift that leads from the hallway to the first room. The lift is at the end of the hallway and is 64 units long. Now it is possible for the player to move freely between the rooms. Properties for the lift: |

Step 6
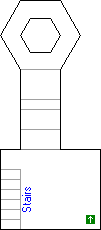 |
Create a stairway along the western side of the first room. This starway is 64 units wide and has six steps, each one is 24 units high and 32 units long. The top step is in the SouthWest corner of the room and its floor is at 144. Make sure that the textures are aligned correctly on both sides of the stairs. Properties for the stairs: |
Step 7
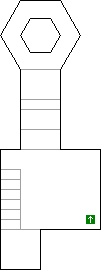 |
Add a third room (128 by 128) which is connected to the top of the stairs. The floor of this room is at 168 (24 more than the top step) and the ceiling is at 240. Check the alignment of the textures on the southern wall of the first room. Properties for the third room: |
Step 8
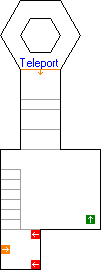 |
Change the linedef which is between the second room and the hallway so that it teleports the player to the third room (note: the player should be teleported when he goes from the second room to the hallway - check the orientation of the linedef). Put the teleporter exit against the southern wall of the third room, facing West. Add two imps in the NorthWest and SouthWest corners of this room, facing East. They should appear on all difficulty levels but the first one. |

Step 9
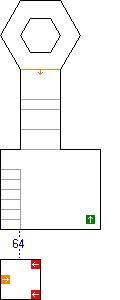 |
Detach the third room from the first one. Let's say that you changed your mind and you want to move this room elsewhere... For example, move it 64 units South. Now, it is a standalone room and the top of the stairs is closed. The player can still go to this room using the teleporter. |

Step 10
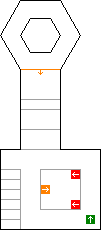 |
Move the third room inside the first one. Leave a 64 units space around it; it will appear as a high platform. Check that you don't have any missing textures. If your editor doesn't automatically put lower and upper textures on the sides of the platform, use BROWNHUG for the upper part and SFALL1 for the lower part. |
Step 11
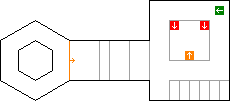
Rotate the whole level 90 degrees counterclockwise. The orientation of the player and monsters should be modified accordingly.
Step 12
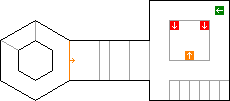
Add a new sector inside the second room, taking the northeastern sixth of the hexagon. Raise the floor and ceiling by 8, so that the floor is at 136 and the ceiling at 200. Decrease the light level to 112. Use the texture STEP1 for the upper and lower panels that are now visible.
Step 13
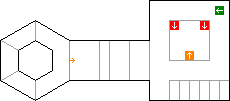
Add another sector taking the southeastern part of the hexagon, symetrical to the previous one and with the same properties. Now, you also have a third new sector between the two other ones (on the eastern side). Raise its floor and ceiling by 16 so that they are at 144 and 208, respectively. Set its light level to 64.
Step 14
Replace all BROWNHUG textures with STARTAN3 (on normal, upper and lower panels). The alignment should be preserved and no other textures should be modified.
Step 15
Do something else... Any suggestions, Steve? :-)
Scoring
I don't think it is a good idea to give a score to each editor, because it should be up to the user to decide which editor(s) she likes. Furthermore, this scenario covers a limited part of what an editor should be able to do and doesn't take the user interface into account. But many people ask for an objective comparison of the various WAD editors and this could help a bit.
Note: I am not satisfied with the scoring system described below. Some aspects of the ease of use are not taken into account (i.e. how many times you have to click or press a key to get the thing done). Any suggestions for a better system? Or some criteria that should be added to the current system?
For each of these steps, add the points as follows:
- 3 points if you were able to perform the task without deleting and re-creating any existing object.
- 2 points if you didn't have to edit some references by hand (i.e. changing sector numbers).
- 2 points if you didn't have to run the consistency checker in order to fix some parts of the level.
- 2 points if everything was done automatically by the editor using a simple command (even multiple times). Count only one point if you had to use a combination of two or three different commands. Count zero points if the task required more than three commands. Pay attention to the missing or extraneous textures on one-sided or two-sided linedefs (having to change them costs one point). Inserting a thing or changing the textures or heights of the floors and ceilings in order to match the descriptions given in the scenario will not count as one command.
- 1 point if it was easy to do and even a novice would have found the easiest way to perform this task correctly.
It is impossible (and pointless) to get the maximum score of 150 for this test, because an editor which has an option for doing every task automatically would suffer from creeping featuritis and any novice would easily get lost in the menus. If you take the time to follow this scenario and build the level, please send me the detailled scores for the editor(s) that you used, as well as a short description of how you performed each step. I will compile the results and put them on this page.
Conclusion
For the moment, I don't think there is a "best editor": each one has its good and bad points and any serious WAD author should use a combination of several programs. This document will hopefully help the programmers to see what features are missing in their programs and why they are necessary.